TL;DR:
- If your drive shows mechanical symptoms or clicking noises, stop using it immediately and seek professional help. For healthy Mac drives, use Time Machine or cloud backups to ensure data safety, while failing drives require read-only imaging with specialized tools. Consulting a professional minimizes permanent data loss and speeds up recovery in urgent situations.
Stop all disk writes immediately. If you need to backup data from a hard drive right now, the correct action depends entirely on drive health: use Time Machine or a bootable clone for a healthy Mac, and switch to read-only disk imaging for any drive showing mechanical symptoms. Macwestlosangeles has handled Mac data recovery in Los Angeles since 2006, offering Free Diagnostics and a No Recovery, No Charge guarantee.
Quick emergency checklist:
- Stop using the drive immediately — every write risks overwriting recoverable data
- If the drive is external, disconnect it from power
- Do not run Disk Utility repair, install software, or reboot repeatedly
- Call Macwestlosangeles at 310-866-0828 for same-day emergency service
TL;DR:
- Healthy drive: use Time Machine, Carbon Copy Cloner, or Backblaze/iCloud for offsite coverage.
- Failing drive: create a read-only image first; skip DIY scans that write to the affected disk.
- Physical symptoms (clicking, grinding, not mounting): call Macwestlosangeles at 310-866-0828 — Free Diagnostics, no charge if recovery isn’t possible.
Table of Contents
- How to recognize drive failure and when to stop trying yourself
- Safe backup methods for a healthy Mac hard drive
- How to safely back up files from a failing drive
- How to verify your backup and store it reliably
- When professional recovery is the right call
- Quick symptom-to-action reference table
- Backing up data from Windows or Linux hard drives
- Step-by-step walkthroughs for common backup tools
- Key Takeaways
- The technician’s perspective on what actually saves data
- Macwestlosangeles: same-day data recovery in Los Angeles
- Useful sources
- FAQ
How to recognize drive failure and when to stop trying yourself
Knowing when to act fast versus when to stop entirely can mean the difference between a full recovery and permanent loss. Apple’s Disk Utility surfaces fatal hardware errors that signal the drive needs professional attention immediately.
| Symptom | Likely Cause | Immediate Action | Urgency |
|---|---|---|---|
| Clicking or grinding noise | Mechanical head failure | Power off, do not restart | Critical |
| Drive not mounting | Firmware, PCB, or head failure | Do not force-mount; call a pro | Critical |
| Repeated I/O errors | Bad sectors or controller issue | Stop writes; attempt read-only image | High |
| SMART fatal hardware error | Imminent physical failure | Back up now; consult service provider | High |
| Slow read speeds, freezing | Early sector degradation | Run Time Machine backup immediately | Moderate |
Do:
- Power off an external drive showing clicking sounds
- Boot from an external macOS volume before attempting any imaging
- Note the exact error message Disk Utility shows
Don’t:
- Run First Aid or fsck on a clicking drive — both write to disk
- Install recovery software on the affected machine
- Power-cycle a humming HDD repeatedly, which accelerates head wear
Pro Tip: On an HDD showing intermittent read errors, reduce spin-up attempts by keeping the drive powered continuously rather than letting it sleep and wake repeatedly — each spin-up cycle adds mechanical stress to already-degraded heads.
Call 310-866-0828 for same-day appointments. Macwestlosangeles is centrally located at 12041 Wilshire Blvd, Ste 26, between the 405 and Santa Monica Freeway, serving West LA, Santa Monica, Beverly Hills, Brentwood, Westwood, Venice, Hollywood, and Culver City.
Safe backup methods for a healthy Mac hard drive
For a Mac with no failure symptoms, three complementary approaches cover every restore scenario. A hybrid cloud and local strategy gives you both fast local restores and offsite resilience against theft, fire, or ransomware.
| Method | Restore Speed | Cost Shape | Best Fit |
|---|---|---|---|
| Time Machine (incremental) | Moderate | Low (external HDD cost only) | Individuals, versioned file recovery |
| Bootable clone (Carbon Copy Cloner / SuperDuper!) | Fast (boot directly) | Low–Medium (software license) | Anyone needing instant failover |
| Cloud backup (Backblaze, iCloud) | Slow (download-dependent) | Medium (monthly subscription) | Offsite protection, ransomware rollback |
| NAS with RAID 1 or RAID 5 | Fast (local network) | Medium–High (hardware cost) | Small businesses, large datasets |
APFS note: Time Machine on APFS volumes uses local snapshots, which means you can restore individual files without an external disk attached. FileVault encryption does not block Time Machine backups, but you must supply the recovery key during a full restore to a replacement drive — store it somewhere other than the encrypted disk itself.
Pro Tip: Follow the 3-2-1 rule: keep 3 copies of your data, on 2 different media types, with 1 copy offsite. Time Machine on an external HDD plus Backblaze covers all three legs automatically once you configure automated schedules.
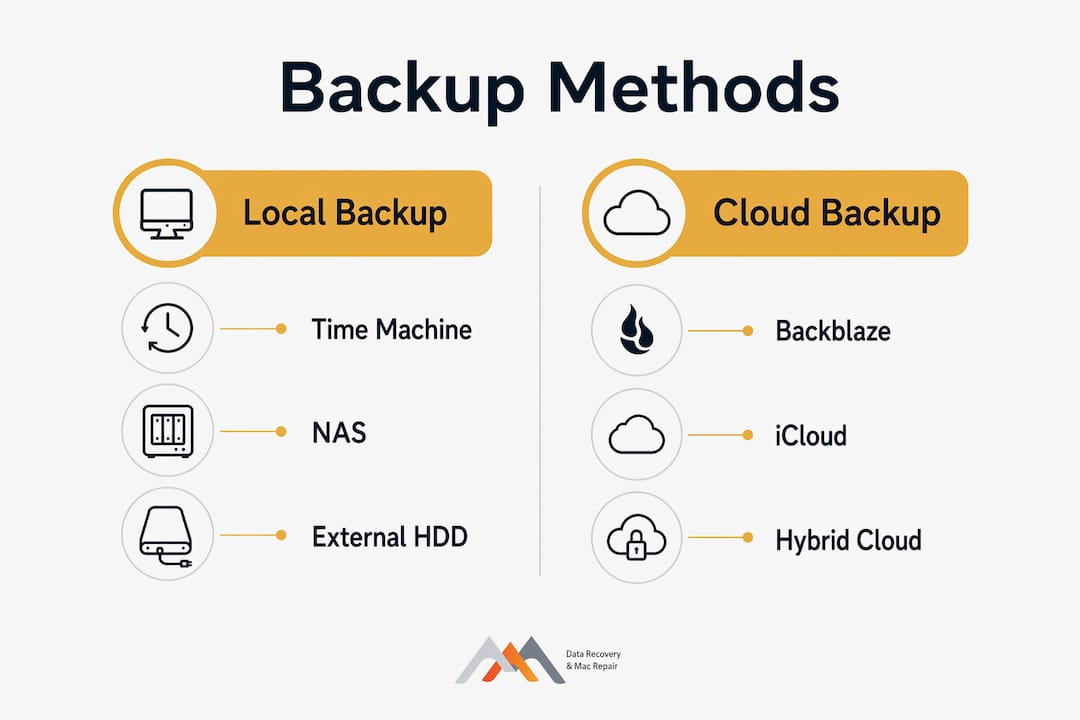
For a full breakdown of backup methods for Mac users, including NAS and hybrid cloud workflows, Macwestlosangeles publishes detailed setup guides on its site.
How to safely back up files from a failing drive
Continuing to use a failing drive overwrites sectors marked as available, making recovery impossible. The goal here is to read as much data as possible, as quickly as possible, without writing anything to the affected disk.
- Stop all activity on the drive. Quit every application accessing it; unmount it if it is external.
- Boot from an external macOS volume or macOS Recovery (hold Option at startup). Never boot from the failing drive itself.
- Attach a healthy target drive with enough free space for a full image of the source.
- Create a read-only disk image using Disk Utility (File > New Image > Image from [Drive]) or use
ddrescuefrom the command line for drives with bad sectors —ddrescueretries unreadable sectors without writing to the source. - Verify the image by mounting it and spot-checking critical folders before ejecting the source drive.
- Copy files from the verified image to your target volume; never write back to the source.
Consumer recovery software often cannot address hardware degradation or APFS encryption and can cause further sector wear when it runs aggressive scans. If the drive produces clicking sounds at any point during imaging, stop immediately and call Macwestlosangeles. Physical failure cases require lab-level tools that no consumer application can replicate.
How to verify your backup and store it reliably
Never assume a backup worked. A backup that has never been tested is not a backup — it is a hope.
- Mount and spot-restore: open the backup volume and manually restore 3–5 critical files to confirm they open correctly
- Boot from your clone: if you made a bootable clone with Carbon Copy Cloner or SuperDuper!, actually boot from it once to confirm it is functional
- Checksum verification: Carbon Copy Cloner includes a built-in verify pass; enable it after every clone operation
- Scheduled test cadence: monthly spot-restores for active project data; quarterly full-clone boots for archives
Pro Tip: Enable versioning and immutable storage on your cloud backup provider. Backblaze retains deleted file versions for 30 days by default (extendable to one year), which means a ransomware attack that encrypts your local files cannot also destroy your cloud history. Pair this with a local Time Machine backup for fast file-level restores.
Backup is preventive; recovery is reactive and may fail if files are already overwritten. A tested, hybrid backup strategy eliminates the need for recovery in most scenarios. For policy templates and retention schedules, Macwestlosangeles covers backup best practices in detail.
When professional recovery is the right call
Choose professional data recovery when the drive shows physical damage, clicking or grinding noises, repeated mounting failures, or when a previous DIY attempt may have overwritten sectors. Professional services offer higher success rates and physical repair capability that no software tool can match.
Macwestlosangeles recovery workflow:
| Service Tier | What It Covers | Typical Turnaround | Typical Cost |
|---|---|---|---|
| Free Diagnostics | Drive assessment, SMART read, failure classification | Same day | $0 |
| Logical recovery | Deleted files, formatted volumes, APFS corruption | typically a few days | cost varies by case |
| Physical repair | Head swap, PCB/logic board component repair, NVMe NAND access | takes several days | costs vary widely depending on case |
| Emergency same-day | Urgent triage and imaging for critical data | same day service available | pricing on request |
Trust signals: Since 2006. Free Diagnostics. No recovery, no charge. Same-day appointments available for urgent cases.
Pro Tip: Bring the drive in without attempting further power cycles. Every additional spin-up on a mechanically failing HDD risks the read/write heads contacting the platter surface, which can render data unrecoverable even in a professional lab.
Call 310-866-0828 or visit the hard drive data recovery service page to book a same-day appointment.
Quick symptom-to-action reference table
| Symptom | Likely Cause | Next Step | Typical Success | Time to Recover | Cost Band |
|---|---|---|---|---|---|
| Accidental deletion, no hardware fault | Logical / file-system | Time Machine restore or read-only image | High | Hours | Low |
| Formatted volume, APFS intact | Logical corruption | Read-only image + logical recovery | Moderate–High | 1–2 days | Low–Medium |
| I/O errors, slow reads | Bad sectors | ddrescue imaging; stop if clicking starts | Moderate | 1–3 days | Medium |
| Clicking / grinding | Mechanical head failure | Power off; professional lab recovery | Low–Moderate | 3–7 days | $500–$3,000 |
| Not detected by macOS | PCB, firmware, or head failure | Professional diagnostics immediately | Varies | 3–10 days | $500–$3,000 |
| APFS/NVMe SSD, encrypted | TRIM, wear-leveling, FileVault | Professional NAND-level access required | Moderate | 3–7 days | Medium–High |
RAID arrays (RAID 0, 1, 3, 5) add complexity: a single-drive failure in RAID 0 means total data loss without a backup, while RAID 1 and RAID 5 tolerate one drive failure but still require professional reconstruction if the controller fails.
Backing up data from Windows or Linux hard drives
Mac users are not the only ones who need a reliable backup strategy. Windows and Linux drives follow the same physical failure patterns, and the triage steps — stop writes, image the drive read-only, verify before copying — apply equally.
Windows: File History (Settings > Backup) handles incremental backups to an external drive. For a full system image, use the built-in “Backup and Restore (Windows 7)” tool still present in Windows 10 and 11. For failing drives, Macrorit Disk Scanner or CrystalDiskInfo can surface SMART data before you attempt imaging.
Linux: rsync with the --checksum flag is the standard for file-level backups. For failing drives, ddrescue (GNU ddrescue) is the preferred imaging tool across all platforms — it maps bad sectors and retries them in a second pass without writing to the source.
Cloud options like Backblaze work across Windows and Mac. For Linux, Backblaze does not offer a native client, so rclone paired with a cloud storage provider (Backblaze B2, Amazon S3) is the practical alternative.
Macwestlosangeles focuses on Apple Mac hardware, but the data recovery services page covers PC and external drive cases as well.
Step-by-step walkthroughs for common backup tools
Time Machine (healthy Mac drive)
- Connect an external drive with at least 1.5x the capacity of your Mac’s internal storage.
- Open System Settings > General > Time Machine and click “Add Backup Disk.”
- Select the external drive; enable encryption if the drive holds sensitive data.
- Time Machine begins its first full backup automatically; subsequent backups run hourly.
- To restore a file, open Time Machine from the menu bar and navigate to the date of the version you need.
Carbon Copy Cloner (bootable clone)
- Download and install Carbon Copy Cloner on your Mac.
- Set the Source to your startup disk and the Destination to the external target drive.
- Enable “SafetyNet” to preserve previous versions on the destination.
- Click “Start Cloning”; enable the verify pass in task settings.
- Test the clone by holding Option at startup and booting from the external drive.
ddrescue (failing drive — command line)
- Boot from an external macOS volume or a Linux live USB.
- Install
ddrescuevia Homebrew:brew install ddrescue. - Identify the source disk identifier with
diskutil list(e.g.,/dev/disk2). - Run:
ddrescue -d -r3 /dev/disk2 /Volumes/Target/image.dmg /Volumes/Target/mapfile.log - The
-r3flag retries bad sectors three times; the map file lets you resume if the drive disconnects. - Mount the resulting
.dmgand copy files to a healthy volume.
Backblaze (automated cloud backup)
- Download the Backblaze client and install it on your Mac or Windows PC.
- Sign in and allow Backblaze to scan your drive; the initial backup runs continuously in the background.
- Exclude system files and applications to reduce upload size; prioritize documents, photos, and project folders.
- Enable Extended Version History in account settings for ransomware protection.
Key Takeaways
For any Mac drive showing physical symptoms, stop writes immediately and call a professional — DIY imaging is appropriate only for drives with logical corruption and no mechanical noise.
| Point | Details |
|---|---|
| Stop writes first | Every write to a failing drive risks overwriting recoverable data permanently. |
| Match method to drive health | Healthy drive: Time Machine or bootable clone. Failing drive: read-only ddrescue image only. |
| Follow the 3-2-1 rule | Keep 3 copies on 2 media types with 1 offsite copy for full resilience. |
| Physical symptoms need professional intervention | Clicking, grinding, or non-mounting drives require expert tools; DIY software can worsen damage. |
| Macwestlosangeles, Los Angeles | Free Diagnostics, No recovery, no charge, same-day appointments since 2006 — call 310-866-0828. |
The technician’s perspective on what actually saves data
The first thing done when a customer brings in a failing Mac drive is a non-invasive SMART read and a visual inspection — before any imaging attempt. Most data loss situations that arrive at the shop could have been avoided or made significantly easier with one simple habit: a tested, automated backup running before the crisis.
The cases that end in full recovery almost always share a common factor: the customer stopped using the drive the moment something felt wrong. A business client once brought in a MacBook Pro with a failing NVMe SSD that had been showing intermittent kernel panics. Because they powered it off immediately and did not attempt a reinstall, the NAND was intact enough for a complete extraction. The client recovered every file. The cases that end in partial or no recovery typically involve repeated reboots, a Disk Utility repair attempt, or a recovery software scan run directly on the affected disk.
Free Diagnostics. No recovery, no charge. If you are unsure whether your drive is failing, bring it in before the situation becomes irreversible.
Macwestlosangeles: same-day data recovery in Los Angeles
When data loss is urgent, the fastest path to a safe outcome is a same-day appointment with a specialist who has the right tools on hand. Macwestlosangeles at 12041 Wilshire Blvd, Ste 26 — between the 405 and Santa Monica Freeway, near UCLA and the Getty Center — has handled Mac data recovery and hardware repair since 2006 for clients across West LA, Santa Monica, Beverly Hills, Brentwood, Westwood, Venice, Hollywood, and Culver City.
What your first visit includes:
- Free diagnostic assessment of your drive (HDD, SSD, NVMe, RAID 0/1/3/5, or memory card)
- SMART data review and failure classification at no charge
- A clear recovery recommendation with a cost estimate before any work begins
- No recovery, no charge guarantee — you pay only if data is successfully retrieved
For hard drive data recovery or Mac repair service in Los Angeles, call 310-866-0828 now to book a same-day appointment.
Useful sources
- Data Backup vs. Data Recovery — CrashPlan: backup strategy, 3-2-1 rule, and hybrid cloud/local approaches
- Check if a Mac disk is about to fail — Apple Support: Apple’s official guidance on Disk Utility SMART error messages
- Complete Mac Data Recovery Guide — The Berkeley Mac Guy: triage steps for failing drives and professional cost ranges
- Recovery software vs. backup restore decision tree — ErrorCodeLab: when DIY software fails on APFS encryption or physical damage
- Data Recovery vs. Data Backup — TechRepairGuy: realistic expectations for DIY software on logical vs. physical failures
- Comparing Data Recovery Methods — AIOTechnical: professional vs. software recovery tradeoffs for Mac users
FAQ
What should I do first if my Mac hard drive is failing?
Stop all disk writes immediately and power off the drive if it is external. Do not run Disk Utility repair or install software on the affected machine — boot from an external volume instead and attempt a read-only image.
How much does professional hard drive data recovery cost?
Physical recovery cases typically range from $500 to $3,000 depending on the failure type and drive model. Macwestlosangeles offers Free Diagnostics and a No recovery, no charge policy, so you receive a cost estimate before any work begins.
Can I back up a failing drive myself using software?
Software recovery works for accidental deletion or simple logical corruption, but it cannot address physical damage and can worsen sector wear through aggressive scanning. If the drive is clicking or not mounting, skip DIY tools and call a professional immediately.
Does FileVault encryption affect my ability to restore from a Time Machine backup?
FileVault does not block Time Machine backups, but you must supply your FileVault recovery key during a full restore to a replacement drive. Store that key somewhere other than the encrypted disk itself — a password manager or printed copy kept offsite works well.
How long does Mac data recovery take at Macwestlosangeles?
Logical recovery typically takes 1–3 days; physical repair cases involving head swaps or logic board component work take 3–7 days. Same-day emergency triage is available — call 310-866-0828 to confirm availability.