Stop all disk writes immediately if the files on that MacBook matter to you. Most liquid damaged MacBooks are possibly repairable, though the outcome depends heavily on the model, the type of liquid involved, and whether the machine was powered on or charging when the spill happened. The single most urgent action is to unplug it, shut it down completely, and stop testing it, since every additional power cycle raises the risk of permanent corrosion.
TL;DR:
- Liquid type significantly influences repair chances, with salt water, coffee, and soda causing more residue and corrosion than plain water.
- Powering off the Mac immediately and avoiding common home remedies like rice or hair dryers is crucial to prevent further internal damage.
- Imaging the drive in read-only mode before attempting repairs preserves data and reduces the risk of permanent loss, especially on soldered SSDs.
- AppleCare+ covers accidental spills under a service fee, but standard warranty excludes liquid damage, making independent repair shops a better option for data recovery.
- Repair timeframes range from same-day port cleanings to longer delays for logic board reconstruction, depending on the damage extent.
Table of Contents
- What to do right after a spill
- Can it be repaired? The factors that decide the outcome
- Professional diagnostics and common repair steps
- Costs and coverage: Apple warranty, AppleCare+, and independent specialists
- Data recovery first: imaging, stop-writes, and what to request
- How to choose a repair provider: checklist and intake questions
- Overview of repair timeframes and expected downtime
- Options and effectiveness of DIY liquid damage treatments
- Signs that liquid damage is beyond viable repair
- Why a lab-first, data-first approach changes outcomes
- Getting your MacBook back: what we offer and how to start
- Sources
- FAQ
What to do right after a spill
The first few minutes after a spill determine a lot about whether repair, or full data recovery, stays realistic. Panic testing, the instinct to see if the Mac still boots, is the single most common way owners turn a fixable problem into an unfixable one.
- Unplug the power cord and any connected accessories, then shut the MacBook down and leave it off; do not try to power it on again to “check.”
- Skip the folk remedies: rice, hair dryers, and shaking the laptop do not remove liquid from internal components and can push moisture deeper into the logic board.
- If a liquid detection alert appears on screen, follow Apple’s guidance to let the ports dry for at least a day before plugging in a charger or accessory; if no alert appears, simply leave the Mac powered off.
- If the files on the drive matter more than the hardware, stop all disk writes and prepare to have the drive imaged before any repair work begins.
Pro Tip: Never plug a charger into a wet USB-C port to “test” it. Apple specifically warns that charging through a wet port can corrode the pins and cause damage that would not otherwise have occurred.
Can it be repaired? The factors that decide the outcome
Repairability hinges on a handful of variables that a technician checks before making any promises. Pure water is far less corrosive than liquids carrying salt, sugar, or acid, so a coffee or soda spill tends to leave more residue and a higher corrosion risk than a splash of plain water.
- Liquid type matters: salt water, coffee, soda, and alcohol leave conductive or sticky residue that keeps corroding long after the spill dries.
- Power state at the time of the spill is one of the strongest predictors of hardware damage, since a live circuit exposed to liquid is far more likely to short than one that was off.
- Liquid detection alerts on newer Apple silicon models confirm that moisture was detected, but an alert alone does not tell you how much damage occurred or whether the Mac is economically repairable.
- “Repaired” has two meanings: getting the Mac to power on again is a different job than preserving the original files on the drive, and a shop should treat them as separate goals.
Common post-spill symptoms include a Mac that will not power on, charging failures, a stuck liquid detection alert, dead USB-C ports, keyboard or trackpad faults, display issues, and boot instability that appears intermittently, sometimes weeks after the spill, as Apple notes in its guidance on delayed corrosion.
Professional diagnostics and common repair steps
A technician’s intake starts with questions, not tools: which model, what liquid, whether the machine was powered or charging, when the spill happened, and whether data recovery or restored function matters more to you. Those answers shape everything that follows, according to Apple’s own repair service guidance for Mac laptops.
- Port and connector inspection to check for corrosion or debris blocking charging or data transfer.
- Battery and charging path testing to confirm the power circuit is intact and safe to re-energize.
- Keyboard, trackpad, and display checks since liquid often travels along ribbon cables to components far from the entry point.
- Logic board inspection under magnification to spot corrosion on traces, capacitors, and connectors before it spreads further.
- Storage imaging, performed before any repair that risks the drive, when data preservation is the priority.
Depending on what turns up, repair options range from corrosion cleaning and connector replacement to board level component rework, or, in more severe cases, full assembly replacement. Our step-by-step guide to logic board repair walks through what component-level work actually involves.
Costs and coverage: Apple warranty, AppleCare+, and independent specialists
Apple’s standard one-year warranty does not cover liquid damage, full stop. AppleCare+ treats a spill as an accidental damage event instead, which comes with its own set service fees rather than free repair. Independent specialists generally structure costs differently, separating diagnostic fees, optional imaging fees, and the actual board repair or parts and labor, with the total varying by model and how far the damage has spread.
| Coverage path | What it covers | How liquid damage is handled |
|---|---|---|
| Apple standard warranty | Manufacturing defects | Excluded; liquid damage voids standard coverage |
| AppleCare+ | Accidental damage, including spills | Covered under a set service fee per incident |
| Independent specialist | Diagnostics, imaging, board repair | Itemized: diagnostic, imaging, and repair costs quoted separately |
- Ask for a written estimate before any work begins, not a verbal ballpark.
- Confirm whether imaging is included, optional, or billed separately from the repair itself.
- Find out whether the shop offers a warranty on the repair work and what it actually covers.
Data recovery first: imaging, stop-writes, and what to request
If the files on that drive matter, the repair should never come before the image. A read-only, sector-by-sector image, sometimes called a bitstream or forensic image, captures the drive exactly as it exists, including unallocated space and deleted file remnants, according to the Library of Congress’s documentation on formats like EWF and E01. That image becomes the safety net a technician can work from, so the original drive never has to take another write cycle.
- Ask explicitly whether the shop images in read-only mode before touching anything else.
- Confirm the lab understands APFS and NVMe storage specifically, since modern MacBooks use soldered SSDs that behave differently than older spinning drives.
- Ask whether they verify the image with a hash or fixity check, and whether you receive a copy or they simply work from it internally.
- If the drive is encrypted with FileVault, have your credentials ready, since recovery without them is far more limited.
Pro Tip: Imaging a failing SSD is time-sensitive. The longer a compromised NVMe drive stays powered and in use, the higher the chance that unreadable sectors become permanently unreadable.
How to choose a repair provider: checklist and intake questions
Not every shop treats data the same way a hardware-first repair shop does, so the questions you ask at intake matter as much as the diagnosis itself.
- Ask whether diagnostics are free and whether the shop follows a no recovery, no charge policy for data recovery work.
- Ask if they image the drive before repair and what experience they have with logic board micro-soldering specifically.
- Request a written scope that separates imaging, board work, parts, and labor, along with a realistic turnaround estimate.
- Ask what warranty, if any, applies to the completed repair.
- Watch for red flags: a shop that refuses to image before repairing, gives vague answers about its process, or pushes you toward a full replacement without explaining why should give you pause.
Overview of repair timeframes and expected downtime
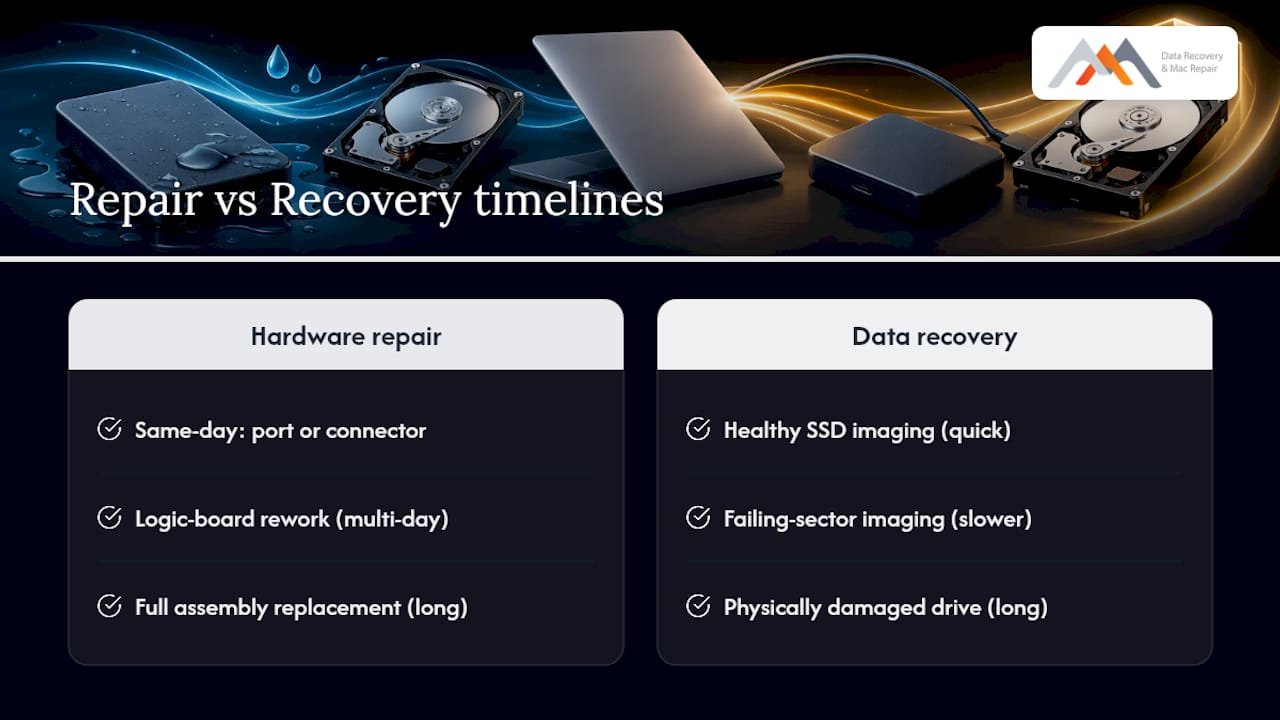
Timeframes vary widely depending on how far the liquid traveled and what needs replacing. A straightforward case, port cleaning or a single connector swap, can sometimes be turned around the same day, particularly when the shop offers same-day appointments for urgent cases. A moderate case involving corrosion on the logic board that requires cleaning and component-level rework typically takes longer, since the technician needs time to isolate every affected trace and confirm the board is stable before reassembly.
The most involved cases, where multiple boards, the battery, and internal cabling all show corrosion, take the longest, especially if parts need to be sourced for a full assembly replacement. Data recovery timelines run on a separate track from hardware repair. Imaging a healthy SSD is relatively quick, but a drive with failing sectors or physical damage can take considerably longer to image safely, since rushing the process risks losing the very data you’re trying to save.
Ask for a time estimate at intake, but treat it as a starting point rather than a guarantee. A technician who commits to a firm timeline before opening the machine and inspecting the logic board is guessing, not diagnosing. The more transparent shops will tell you upfront that the estimate may shift once they see what the liquid actually reached.
Options and effectiveness of DIY liquid damage treatments
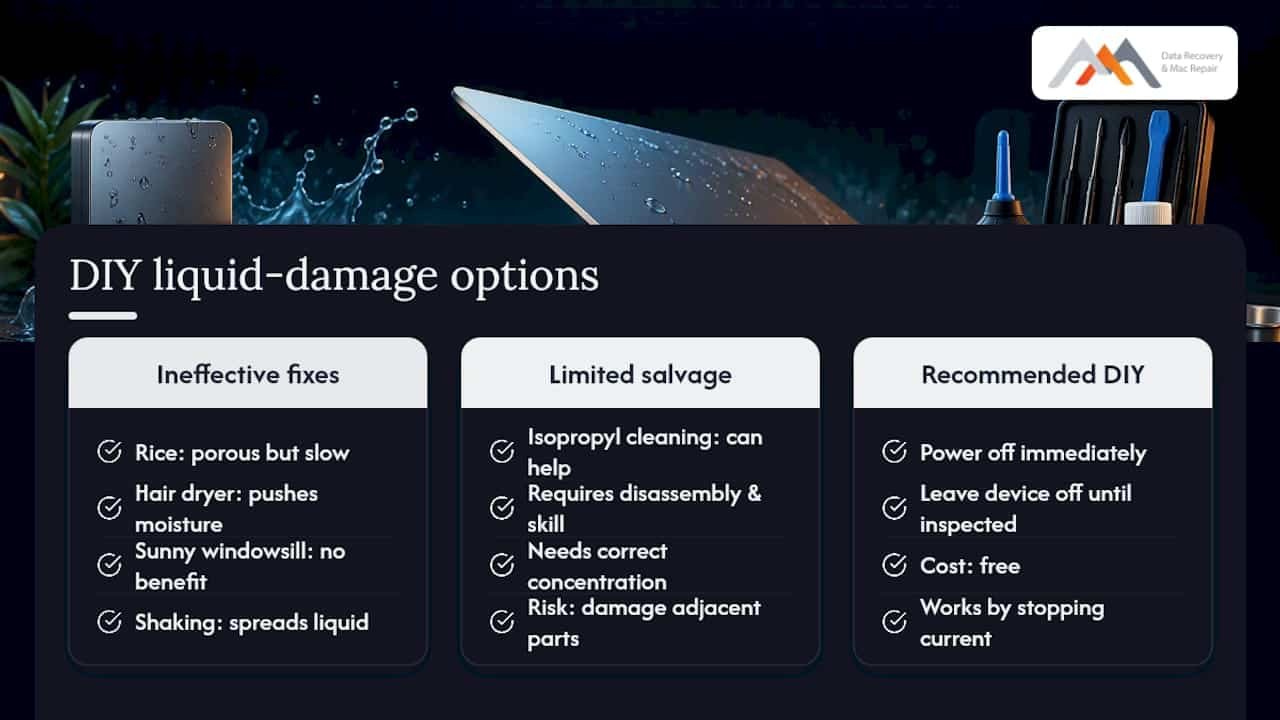
The rice trick does not work, and neither does a hair dryer, a sunny windowsill, or vigorous shaking. Rice is porous but slow, and it does nothing for liquid that has already reached solder joints or connector pins deep inside the case. A hair dryer risks pushing moisture further into the machine or introducing static discharge near sensitive components. Shaking the laptop can spread liquid to areas it had not yet reached.
The only DIY step with real value is the one covered earlier: powering the machine off immediately and leaving it off. That single action does more to limit damage than any home remedy, because it stops an electrical current from turning a wet component into a corroded one. Isopropyl alcohol cleaning, sometimes recommended in enthusiast repair guides, can help dissolve some residues, but it requires disassembly, the right concentration, and enough experience to avoid damaging adjacent parts, which puts it well outside typical home repair territory according to guides like iFixit’s water damage documentation.
The honest answer is that effective liquid damage treatment happens under magnification, with the right solvents and tools, not on a kitchen counter. If you’re not equipped to open the case, inspect the board, and clean corrosion at the component level, the safest DIY move is the one that costs nothing: turn it off and leave it off until a professional looks at it.
Signs that liquid damage is beyond viable repair
Some MacBooks reach a point where repair no longer makes economic sense, even if a technician could theoretically fix them. Widespread corrosion that has spread across multiple boards, rather than staying contained near the spill point, is one of the clearest signs, since cleaning and reworking that much surface area often costs more than the machine is worth. A logic board with damage to the system on chip itself, rather than to surrounding components, is another marker, since chip-level failures are far harder and more expensive to resolve than a corroded connector or a failed capacitor.
Repeated liquid detection alerts that persist even after proper drying time can indicate liquid pooled somewhere that has not fully evaporated, which points to a harder to reach failure. A Mac that briefly powers on and then shuts down repeatedly, especially after the battery or a board component has already been replaced once, suggests damage that keeps propagating rather than damage that has been fully resolved.
None of these signs mean your data is gone. Even when the hardware itself is not worth repairing, an intact drive can often still be imaged and its contents recovered, which is why separating the data question from the hardware question matters so much at intake.
Why a lab-first, data-first approach changes outcomes
The biggest mistake we see is treating repair and data recovery as the same job. They are not. A data-first workflow stops writes, images the drive in read-only mode, and only then moves to repair, working from that image whenever the original drive is too fragile to risk. Component-level logic board repair, when it’s viable, preserves the original hardware instead of defaulting to a full assembly swap that costs more and discards parts that were never actually damaged. That distinction, built on lab experience since 2006, free diagnostics, and a no recovery, no charge policy, is why we push for imaging before assumptions and same-day appointments when a business or a semester’s worth of files is on the line.
— Kaya
Getting your MacBook back: what we offer and how to start
If you’re staring at a MacBook that took a spill, the choice isn’t between “send it to Apple” and “hope for the best.” Some repair services handle liquid damage by imaging first when data matters, then repairing at the component level rather than opting for a full board swap by default. Our lab has worked on Apple hardware since 2006, from a Los Angeles location that serves West LA, Santa Monica, Beverly Hills, Brentwood, Westwood, Venice, Hollywood, and Culver City, centrally located at 12041 Wilshire Blvd, Ste 26, between the 405 and Santa Monica, near UCLA and the Getty Center.
- MacBook liquid damage repair and logic board component repair, including micro-soldering
- APFS and NVMe-aware imaging for MacBooks with soldered SSDs
- Free diagnostics and a no recovery, no charge policy on data recovery work
- Same-day appointments for urgent cases
To book, call 310-866-0828 and have the model, serial number, what spilled, when it happened, and any symptoms ready. That information lets us start the right diagnostic path the moment your Mac arrives. Visit our liquid damage repair page for more on what to expect at intake, or check our full data recovery services if preserving files is your main concern.
Sources
- If you see a liquid-detection alert on your MacBook Air or MacBook Pro – Apple Support
- AppleCare+ for Mac terms and fee examples
- Expert Witness Disk Image Format (EWF) Family – Library of Congress
FAQ
Can a MacBook be repaired after liquid damage?
Yes, in most cases, though the outcome depends on the liquid type, whether the machine was powered on during the spill, and how far corrosion spread before it reached a technician. A MacBook powered off immediately after a spill has a meaningfully better chance of full repair than one that kept running or was tested repeatedly afterward.
How much does it cost to fix a liquid damaged MacBook?
Cost depends on the extent of the damage: a simple port cleaning costs far less than logic board component rework or a full assembly replacement. Under AppleCare+, accidental damage like a spill carries a set service fee, while independent specialists typically quote diagnostics, imaging, and repair as separate line items.
Does Apple repair water damaged MacBooks?
Apple’s standard warranty excludes liquid damage, but Apple will service a liquid damaged Mac under AppleCare+ or as an out-of-warranty paid repair. Independent specialists are often a better fit when data recovery is the priority or when a device has been deemed uneconomical to repair through Apple.
Will Apple fix liquid damage?
Apple can fix liquid damage, but coverage depends on whether the device has AppleCare+, since the standard warranty does not include accidental spills. Without AppleCare+, Apple typically charges an out-of-warranty repair fee, and severe cases may be quoted as a full logic board or assembly replacement rather than a targeted repair.
What should I do immediately after spilling liquid on my MacBook?
Unplug it, shut it down completely, and do not power it back on to test it, since testing a wet Mac is one of the most common ways to turn a recoverable spill into permanent damage. If a liquid detection alert appears, Apple recommends waiting at least a day for the ports to dry before attempting to charge or connect anything.