Yes, emptied trash recovery is often possible — but success depends on your storage type, how much time has passed, and whether you stop writing to the disk right now. On a traditional HDD, deleted file bytes typically remain until overwritten, giving recovery software a real window. On a modern SSD with TRIM enabled, particularly an internal APFS volume on a Mac, that window can close within minutes. Check Time Machine, Windows File History, or your cloud provider’s trash folder first. If those options come up empty, recovery software like Disk Drill, EaseUS Data Recovery, Recuva, or TestDisk/PhotoRec can scan unallocated space. When hardware damage, RAID, or instant TRIM behavior is involved, Macwest Data Recovery handles professional lab work.
Stop all disk writes immediately. Every file you save, every app you open, every system process that writes to the affected drive reduces your chances of getting those files back.
Key Takeaways
Emptied trash recovery succeeds most often when you stop all disk writes immediately, check backups first, and use recovery software on a cloned image rather than the source drive.
| Point | Details |
|---|---|
| Stop writes immediately | Every file saved to the affected drive reduces recovery odds; act before opening any app. |
| Backups are the safest route | Time Machine, File History, and cloud trash folders recover files faster and more reliably than any scan. |
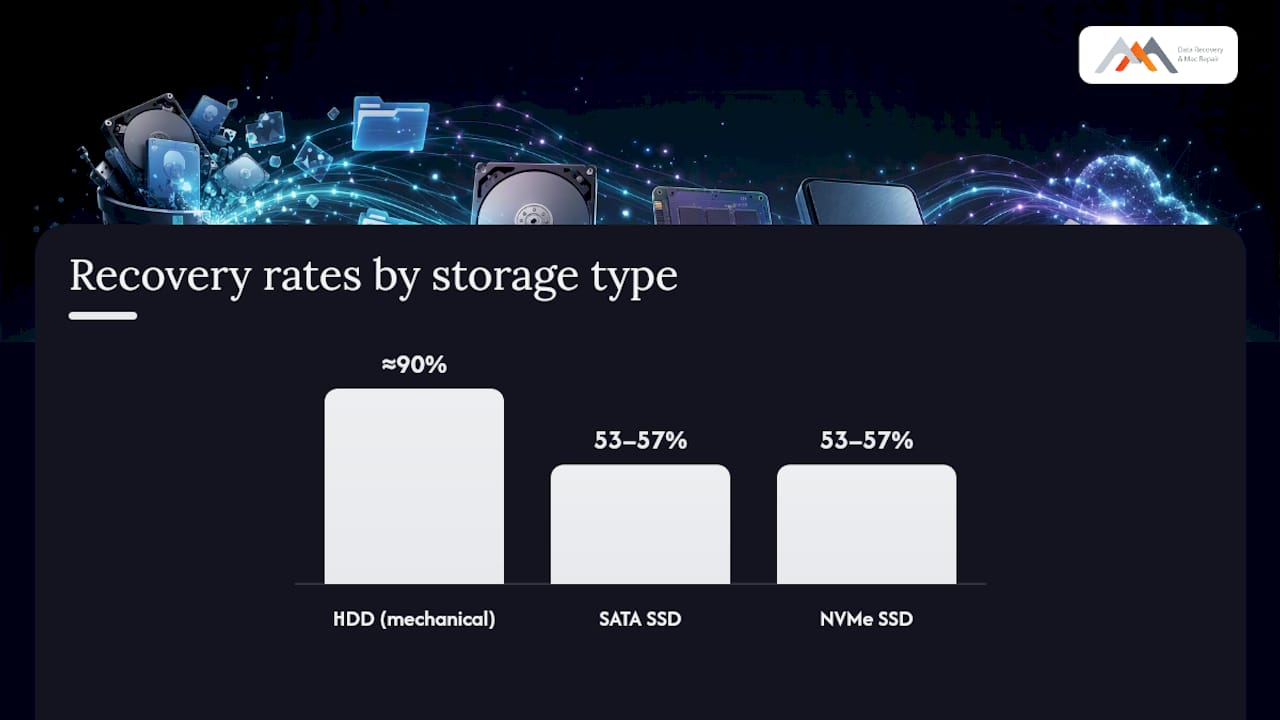
| SSD/TRIM limits recovery fast | HDDs retained ~90% of deleted artifacts in IEEE testing; NVMe and SATA SSDs retained 53–57%, dropping further with time. |
| Use a cloned image for scans | Run Disk Drill, EaseUS, Recuva, or TestDisk/PhotoRec on a disk image, never the original source. |
| Macwestlosangeles for critical cases | Call 310-866-0828 for same-day appointments; free diagnostics and no-recovery, no-charge since 2006. |
Table of Contents
- What to do in the first minutes after you emptied the Trash
- Check your backups and cloud trash before running any scan
- How to recover deleted files on Windows after emptying the Recycle Bin
- How to recover files on macOS after emptying Trash
- Why SSDs are so much harder to recover from than HDDs
- Recovering deleted files from cloud services and mobile devices
- When should you stop DIY recovery and call a professional?
- What recovery typically costs and how long it takes
- How to prevent accidental deletion from happening again
- What the data actually tells us about recovery outcomes
- Macwest Data Recovery: same-day help when you need it most
- Sources
- FAQ
What to do in the first minutes after you emptied the Trash
Speed matters more here than almost anything else. The steps below apply whether you are on Mac, Windows, or a cloud-synced device.
- Stop using the affected drive. Close all open applications. Pause or disable cloud sync (iCloud Drive, OneDrive, Google Drive) so the sync client does not write new data to the volume.
- Decide on power state. If the machine is running and you can act immediately, keep it on and start recovery. Powering off an SSD-based Mac with APFS can trigger additional garbage collection on restart. On a mechanical HDD, powering down is safer if you cannot act for several hours.
- Do not install recovery software to the affected drive. Download Recuva, Disk Drill, or EaseUS to a second internal drive, an external USB drive, or a USB stick. Installing to the same volume you are trying to recover from can overwrite the exact sectors holding your deleted files.
- Do not run Disk Utility’s First Aid, chkdsk, or any repair utility on the suspect disk before imaging it. These tools write to the volume and can destroy recoverable data.
- Create a disk image first when possible. Tools like
ddrescueorddlet you clone the drive sector-by-sector to an external disk. Run all scans on the image, not the original. As Save My Disk’s recovery guide notes, imaging before scanning is the single most protective step in any DIY workflow.
Pro Tip: Download recovery software installers to a USB drive on a different computer, then run the tool from that USB on the affected machine. This keeps the suspect drive completely read-only until you are ready to scan.
Check your backups and cloud trash before running any scan
The fastest, safest route to recovering deleted items is almost always a backup or a cloud-side trash folder. Run through these options before touching recovery software.
Time Machine (Mac)
- Connect your Time Machine disk or confirm your Time Machine network volume is reachable.
- Open the folder where the deleted files lived, then click the Time Machine icon in the menu bar and select “Enter Time Machine.”
- Use the timeline on the right to navigate to a snapshot predating the deletion.
- Select the files and click “Restore.” Time Machine copies them back to the original location without touching the rest of the volume.
If you use APFS local snapshots (enabled by default on macOS Monterey and later), Time Machine may have a snapshot from earlier the same day even without an external disk connected.
Windows File History and Previous Versions
- Right-click the folder that contained the deleted files and select “Properties,” then the “Previous Versions” tab.
- Choose a restore point predating the deletion and click “Restore” or “Open” to copy specific files out.
- If File History is not enabled, check whether System Restore created a volume shadow copy. Open a Command Prompt as Administrator and run
vssadmin list shadowsto see available shadow copies.
Cloud provider trash folders
- Google Drive: Open drive.google.com, click “Trash” in the left sidebar. Items stay there for 30 days after deletion.
- OneDrive: Go to onedrive.live.com, click “Recycle Bin.” Microsoft retains deleted items for 30 days for personal accounts and up to 93 days for Microsoft 365 business accounts.
- iCloud Drive: Visit icloud.com, open “iCloud Drive,” then click “Recently Deleted” at the bottom of the sidebar. Items are available for up to 30 days.
- Dropbox: Log in to dropbox.com, click “Deleted files.” Retention is 180 days on Plus/Professional plans and 30 days on Basic.
Pro Tip: Check every device synced to the same cloud account. A file deleted on your Mac may still exist in the local cache on your iPhone or a second computer that has not yet synced the deletion. Download a copy immediately before the sync propagates.
How to recover deleted files on Windows after emptying the Recycle Bin
Microsoft’s community guidance confirms that files removed from the Recycle Bin often remain on the volume until overwritten. On a Windows HDD, that window can be hours to days. On an NVMe SSD with TRIM active, it can be much shorter.
Safe workflow:
- Check Previous Versions first (see the section above). If File History was running, this is your fastest path.
- Image the drive using a bootable tool like Hiren’s BootCD PE or a Linux live USB running
ddrescue. Save the image to an external drive with enough free space. - Run Recuva (free, by Piriform) on the image for quick logical deletions. Use “Deep Scan” mode for best results. Recuva is lightweight and does not require installation if you use the portable version.
- Escalate to EaseUS Data Recovery Wizard or R-Studio for deeper scans when Recuva finds nothing. These tools reconstruct file system structures and can recover files even after a Quick Format.
- Save all recovered files to a separate drive — never back to the source volume. As Wondershare Recoverit’s guidance states, writing recovered data to the same disk risks overwriting other files still waiting to be found.
Warnings:
- Do not click “Format” if Windows prompts you to format the drive.
- Do not run
chkdskon the suspect volume before imaging. - Do not install recovery software to the affected drive.
How to recover files on macOS after emptying Trash
You may retrieve deleted files on Mac if Time Machine snapshots exist or if the data has not yet been TRIMmed or overwritten. Act immediately, because APFS internal SSDs can lose recoverable data within minutes to hours depending on system activity.
Check your filesystem first
Open Disk Utility, select the volume, and look at the “Type” field. APFS and HFS+ behave very differently in recovery scenarios.
- APFS (most Macs from 2017 onward): Uses copy-on-write and local snapshots. TRIM is active on internal SSDs. Check Time Machine snapshots before anything else. Recovery software can still scan unallocated space, but the window is short.
- HFS+: Older filesystem, no native snapshots. Deleted file entries linger longer on HDDs. Recovery software tends to perform better here than on APFS SSDs.
FileVault encryption
If FileVault is enabled, the volume must be unlocked before any recovery tool can read it. Boot normally and log in, or unlock the volume from macOS Recovery using your Apple ID or recovery key. Scanning an encrypted, locked volume returns nothing useful. For more on how encryption affects scanability, see why MacBook encrypted drives complicate data recovery.
Recovery workflow
- Check Time Machine snapshots first (see the backup section above).
- Boot from an external macOS drive or a recovery USB to keep the internal SSD as idle as possible.
- Clone the internal drive using
ddor Disk Drill’s “Byte-to-byte backup” feature to an external HDD. - Run Disk Drill, EaseUS Data Recovery for Mac, or TestDisk/PhotoRec on the cloned image.
- Save recovered files to a third drive, separate from both the source and the image.
Pro Tip: On Apple Silicon Macs (M1, M2, M3, M4), the internal NVMe SSD is encrypted at the hardware level by the Secure Enclave. Recovery tools running on a second Mac via Target Disk Mode cannot decrypt the drive without the original machine’s credentials. Always run recovery tools on the original machine or a cloned, unlocked image.
For a detailed Mac SSD recovery workflow, including imaging steps specific to Apple Silicon, Macwestlosangeles maintains a step-by-step guide for LA users.
Why SSDs are so much harder to recover from than HDDs
The short answer: HDDs keep deleted data until a new file physically overwrites those sectors. SSDs actively erase blocks marked as free, often before you even realize a file is gone.
How TRIM and garbage collection work
When you delete a file on an SSD, the operating system sends a TRIM command telling the drive controller which blocks are now free. The SSD’s garbage-collection process then erases those blocks in the background to prepare them for future writes. Apple removed Secure Empty Trash in macOS Sierra precisely because secure overwrites are ineffective on SSDs — TRIM already handles erasure at the hardware level, making forensic recovery of those blocks impossible once garbage collection runs.
A 2023 IEEE TrustCom paper measured recovery rates across drive types and found HDDs retained roughly 90% of deleted artifacts in testing, while NVMe and SATA SSDs retained 53–57% — and that figure dropped further as time passed.
| Storage type | Typical recovery outlook | Recommended action |
|---|---|---|
| HDD (mechanical) | Good; data persists until overwritten | Image immediately, then scan |
| SATA SSD | Moderate; TRIM reduces odds quickly | Act within hours; image first |
| NVMe SSD | Poor to moderate; garbage collection is fast | Act within minutes; check backups first |
| Encrypted APFS (internal) | Very limited without snapshots | Check Time Machine; call a pro if critical |
Recovering deleted files from cloud services and mobile devices
Cloud providers and mobile apps typically hold deleted items in a server-side trash folder for a defined retention period. Check there before attempting any local disk recovery.
Cloud services: step-by-step
- Google Drive / Google Photos: Visit drive.google.com or photos.google.com, open “Trash” or “Bin.” Select files and click “Restore.” Items are retained for 30 days.
- OneDrive: Go to onedrive.live.com, open “Recycle Bin.” Restore individual files or use “Restore all items.” Check account activity under Settings to see deletion timestamps.
- iCloud Drive / iCloud Photos: Log in at icloud.com. In iCloud Drive, click “Recently Deleted.” In Photos, open the “Recently Deleted” album. Both retain items for 30 days.
- Dropbox: Log in, click “Deleted files” in the left panel. Restore individual versions or entire folders.
iPhone and Android
- iPhone: Open the Photos app, tap “Albums,” scroll to “Recently Deleted.” Files stay there for 30 days. For non-photo files, check the Files app’s “Recently Deleted” folder.
- Android: Google Photos has a “Trash” folder with a 30-day window. Samsung Gallery has a similar “Recycle Bin.” Third-party file manager apps vary.
- Local backups: If you back up your iPhone to a Mac via Finder (or iTunes on Windows), you can restore a recent backup to recover deleted files. Note that a full restore replaces all current data, so copy what you need from a backup selectively using a tool like iMazing.
Quick checklist before moving to local disk recovery:
- Verify server-side trash on every linked cloud account.
- Check all synced devices before the deletion propagates.
- Download and save copies of restored files to an external drive immediately.
- If cloud trash is empty and local backups are absent, proceed to disk-level recovery software or contact a professional.
When should you stop DIY recovery and call a professional?
Some situations make DIY attempts actively harmful. Knowing when to stop is as important as knowing how to start.
Stop DIY and contact a professional when you see any of these:
- Clicking, grinding, or beeping sounds from the drive (mechanical failure).
- The drive does not mount or appears in Disk Utility as “Not Mounted” or with errors.
- You are dealing with a RAID 0, 1, 3, or 5 array where one or more drives have failed.
- The volume is encrypted and you have lost the recovery key or password.
- A logic board failure is preventing the Mac from booting at all.
- DIY scans have already run and returned nothing, or the scan corrupted the file system further.
- The data is business-critical and the cost of permanent loss exceeds the cost of professional recovery.
While you wait for intake:
- Do not run additional recovery tools.
- Document the symptoms: any error messages, the last time you successfully accessed the files, and what actions you took after the deletion.
- Note your device serial number, macOS or Windows version, and storage type.
Pro Tip: Pull a S.M.A.R.T. report before you bring the drive in. On Mac, use Disk Utility or a free tool like DriveDx. On Windows, use CrystalDiskInfo. The report gives the technician an immediate picture of drive health and can cut diagnostic time significantly.
Macwest Data Recovery has served West LA, Santa Monica, Beverly Hills, Brentwood, Westwood, Venice, Hollywood, and Culver City since 2006. For complex cases requiring forensic data recovery, the lab handles APFS, NVMe, RAID 0/1/3/5, and logic board component repair.
What recovery typically costs and how long it takes
DIY software (Recuva, TestDisk/PhotoRec) is free and handles straightforward logical deletions well. Commercial suites like Disk Drill and EaseUS Data Recovery Wizard run $50–$100 for a license and add deeper scan modes and file-preview capabilities. Professional hard drive data recovery in a cleanroom environment starts around $500 for mechanical failures and can reach $3,000 or more for RAID arrays or severe physical damage.
How to prevent accidental deletion from happening again
The best emptied trash recovery is the one you never need. These steps take under an hour to set up and can save days of recovery work.
Backup checklist (3-2-1 rule):
- Keep three copies of important data.
- Store them on two different media types (e.g., internal drive plus external HDD).
- Keep one copy offsite or in cloud storage.
Settings to change now:
- Mac: Enable Time Machine with an external drive or a NAS. In macOS Ventura and later, Time Machine creates hourly local APFS snapshots automatically.
- Windows: Enable File History (Settings → Update & Security → Backup). Point it at an external drive and set it to back up every hour.
- Cloud versioning: In Google Drive, OneDrive, and Dropbox, enable file versioning so previous versions of edited or deleted files are retained beyond the standard trash window.
- Trash retention: On Mac, go to Finder → Settings → Advanced and enable “Remove items from the Trash after 30 days.” This gives you a 30-day safety net before permanent deletion.
Practical habits:
- Use a two-step deletion workflow for critical files: move them to an archive folder first, wait 48 hours, then delete.
- Label important project folders with a color tag in Finder or Windows Explorer so they stand out before you select and delete.
- Schedule a quarterly restore test: pick a random file from your backup and verify you can actually restore it. Backups that have never been tested have a way of failing exactly when you need them.
Pro Tip: Set a calendar reminder every 90 days to verify your Time Machine or File History backup completed successfully. A backup that silently stopped running three months ago is no backup at all.
What the data actually tells us about recovery outcomes
The pattern seen across accidental-deletion cases is consistent: the most common cause of irrecoverability is not the deletion itself but what happens in the minutes after it. Users who immediately open a browser to search for recovery advice, download a tool to the same drive, or restart the machine have often already overwritten the sectors they needed. The second most common cause is an SSD with TRIM active, where garbage collection runs before the user even realizes a file is missing.
Macwestlosangeles operates at 12041 Wilshire Blvd, Ste 26, centrally located between the 405 and Santa Monica Fwy, near UCLA and the Getty Center, and has handled Mac data recovery cases since 2006. The shop’s technical scope covers APFS, NVMe, RAID 0/1/3/5, and logic board component repair, with free diagnostics and a no-recovery, no-charge policy on every case. Same-day appointments are available for urgent situations across West LA, Santa Monica, Beverly Hills, Brentwood, Westwood, Venice, Hollywood, and Culver City.
Macwest Data Recovery: same-day help when you need it most
When DIY tools have not delivered results, or when the drive shows signs of physical damage, Macwestlosangeles provides the fastest path to professional recovery in the Los Angeles area. Call 310-866-0828 to book a same-day appointment. Free diagnostics are included on every case, and the no-recovery, no-charge policy means you pay only when your files come back.
At intake, a technician will assess your drive’s health, identify the filesystem (APFS, HFS+, NTFS), check for TRIM activity and encryption status, and give you a clear recoverability estimate before any work begins. Services cover Mac and PC data recovery across hard drives, SSDs, RAID arrays (0, 1, 3, 5), memory cards, and liquid-damaged logic boards. Drop off at 12041 Wilshire Blvd, Ste 26, or call ahead for pickup options across West LA, Santa Monica, and Beverly Hills.
Sources
FAQ
Can you recover files after emptying the Trash on Mac?
Often yes, if you act before TRIM or garbage collection erases the blocks. Check Time Machine snapshots first; if none exist, run Disk Drill or EaseUS Data Recovery on a cloned image of the drive.
Can permanently deleted files still be recovered?
Yes, in many cases. Deleting and emptying the Trash removes only the directory entry; the file data typically remains on disk until overwritten. Recovery software scans unallocated space to reconstruct those files, though SSD TRIM can make blocks unreadable quickly.
How do you restore an emptied Trash on iPhone?
Open the Photos app and tap “Recently Deleted” under Albums. Photos stay there for 30 days. For other file types, check the Files app’s “Recently Deleted” folder or restore from an iTunes/Finder backup using a tool like iMazing to extract specific files.
How do you recover an emptied Trash on Android?
Open Google Photos and tap “Library,” then “Trash.” Items are retained for 30 days. Samsung Gallery has a built-in Recycle Bin. If the file was not in a cloud-backed app, recovery depends on whether a local backup exists.
When should you call a professional instead of using recovery software?
Call a professional when the drive makes clicking or grinding sounds, fails to mount, is part of a RAID array, or when DIY scans return nothing. Macwestlosangeles offers free diagnostics and same-day appointments at 310-866-0828 for urgent cases across Los Angeles.