If your iMac shows no fans, no chime, and no light when plugged in, the power supply is the most likely culprit, and an experienced hobbyist with the right tools can replace it safely at home. Anyone unsure about handling stored electrical charge or separating an adhesive-mounted display should skip straight to a professional. Before touching anything inside the case, read the capacitor discharge warnings below. If the machine also failed to boot before it died, stop all disk writes immediately and consider your data recovery options first.
TL;DR:
- A dead iMac with no signs of power is most likely caused by a faulty power supply, but other issues like outlet problems or a bad System Management Controller should be ruled out first.
- The internal diagnostic LED and capacitor discharge procedure are crucial steps to safely confirm the power supply’s functionality before opening the case or replacing parts.
- Repairing or replacing the power supply involves careful adhesive removal and display handling, with costs ranging from $50 to $350 depending on parts and professional service.
- A dark standby LED indicates a high likelihood of power supply failure, but a lit LED with no power suggests a logic board issue rather than the power supply.
- DIY repairs require specific tools, tested parts, and patience to avoid damaging the display or risking electrical shock; professional diagnostics are recommended if data recovery or uncertain faults are involved.
Table of Contents
- How Do You Confirm an iMac Power Supply Fault?
- What Safety Steps Come Before You Open the Case?
- What Tools and Parts Do You Need?
- Step-by-Step: Removing and Replacing the Power Supply
- How Do You Test the Repair and Troubleshoot New Problems?
- What Does an iMac Power Supply Repair Actually Cost?
- When Should You Call a Professional Instead?
- Where to Find Model-Specific Repair Guides
- An Editorial Take on Fixing It Yourself
- Get a Free Diagnostic Instead of Guessing
- Sources
- FAQ
How Do You Confirm an iMac Power Supply Fault?
A dead iMac isn’t always a dead power supply. Before you crack the case, rule out the boring stuff: a bad outlet, a damaged cable, or a stuck System Management Controller.
Start with the power cord itself. Try a different outlet, ideally one you’ve already confirmed works with a lamp or phone charger, and inspect the cable for kinks, pet damage, or a bent prong. Intel iMacs draw power through a standard IEC cable, and a worn cord is a more common failure point than people expect, especially on units that get moved or unplugged often.
Next, reset the SMC. Shut the iMac down completely, unplug it for 15 seconds, then plug it back in and wait 5 seconds before pressing the power button. If the machine still shows zero signs of life, the SMC reset won’t fix a hardware fault, but ruling it out first saves you from opening a perfectly good logic board for nothing.
The most reliable at-home check is the internal diagnostic LED. Intel iMacs have four small LEDs visible through the vents on the back of the case, and LED 1 specifically indicates standby power delivered by the power supply. If that LED stays dark while the unit is plugged in, the power supply is very likely the point of failure. If LED 1 lights up but the machine still won’t power on when you press the button, the fault probably sits elsewhere, on the logic board or the power button switch itself.
Here’s the quick-check order most technicians actually follow:
- Test a different outlet and a different power cable.
- Look for LED 1 through the back vent with the unit plugged in.
- Run an SMC reset and observe LED behavior before and after.
- If comfortable with a multimeter, check for continuity on the cable and verify voltage at the wall outlet reads close to your regional standard.
Pro Tip: Keep a small flashlight angled at the vent slots when checking LEDs. Room glare washes out the dim standby light and leads a lot of people to misdiagnose a working PSU as dead.
A dark LED 1 is one of the strongest single-check signals available to a hobbyist. It’s not a certainty, since a shorted logic board can sometimes pull standby power down too, but it’s the fastest way to decide whether opening the case is worth your time.
What Safety Steps Come Before You Open the Case?
Power supply capacitors in an iMac can hold a lethal charge even after the machine has been unplugged for hours. This isn’t a theoretical warning. Bench technicians working on 27" iMac supplies have measured discharge points sitting near 395 volts DC, which is more than enough to cause serious injury if you touch the wrong leads with bare skin.
The standard discharge procedure, repeated across every model-specific guide iFixit publishes, is straightforward: unplug the iMac, then hold the power button down for roughly 10 seconds. This bleeds residual charge out of the capacitors before you ever remove a screw. Never touch capacitor leads directly, even after this step, and always handle the power supply by its edges rather than gripping the board face.
Before you start, gather the right protective setup:
- Insulated screwdrivers rated for electrical work, not generic hardware-store bits.
- A grounded anti-static wrist strap and a static-dissipative mat for the logic board and connectors.
- Nitrile or similar insulated gloves for the discharge and removal steps.
- A padded surface or a proper service wedge to support the glass and display assembly once separated.
The display on Intel iMacs is heavy, glued down, and expensive to crack. A service wedge or a dedicated support stand holds it at a safe angle while you work underneath, which is exactly why bench shops use heated tables or purpose-built jigs instead of propping the screen against a stack of books. If you skip this step, you risk stressing the LCD cable or cracking the glass on reinstall, turning a $150 power supply job into a display replacement.
If the iMac held any data you haven’t backed up, stop all disk writes immediately before you do anything else. Opening the case doesn’t threaten the drive directly, but a power supply repair gone wrong can. If the drive matters more than the timeline, back it up or pull the data first.
What Tools and Parts Do You Need?
The tool list for an iMac power supply swap is short but specific, and using the wrong opener is the fastest way to gouge the aluminum housing or crack the display glass.
You’ll need an iMac opening wheel or a set of thin plastic opening picks, a service wedge to prop the display once the adhesive releases, and a handful of plastic spudgers for disconnecting ribbon cables without tearing them. For the fasteners, Intel iMacs mix T8 and T10 Torx drivers depending on the screw location, so having both sizes on hand avoids a mid-repair supply run.
- iMac opening wheel or plastic opening tools (not a metal pry bar).
- Service wedge or equivalent prop for the display.
- Plastic spudgers, several sizes.
- T8 and T10 Torx drivers.
- New adhesive strips sized for your exact model.
- Anti-static wrist strap.
Parts sourcing matters more than most DIYers expect. OEM power supplies pulled from working donor units and tested before sale are the safer bet. New-old-stock units sitting in a warehouse for a decade aren’t automatically safe either, since electrolytic capacitors degrade in storage even when never powered on. Buy from a seller who tests before shipping and offers a real return window if the part arrives dead.
Model differences change both your parts list and your time budget. The 27" iMacs use adhesive-mounted displays that require fresh adhesive strips on reassembly, which adds cost and a waiting period for the seal to cure. Some 21.5" models share that adhesive design, while older screw-mounted variants skip the re-seal step entirely, cutting your repair time noticeably.
Step-by-Step: Removing and Replacing the Power Supply
This is the full sequence for an Intel iMac power supply swap, whether you’re working on a 21.5" or a 27" model. Screw counts, cable positions, and adhesive width vary between models and years, so treat this as the map and the model-specific iFixit guide as your turn-by-turn directions.
- Power off and unplug. Shut the iMac down fully and disconnect the power cable. Don’t work on a machine that’s merely sleeping.
- Discharge the capacitors. Hold the power button for 10 seconds with the cable unplugged. This is not optional, and skipping it is the single most dangerous shortcut in this entire process.
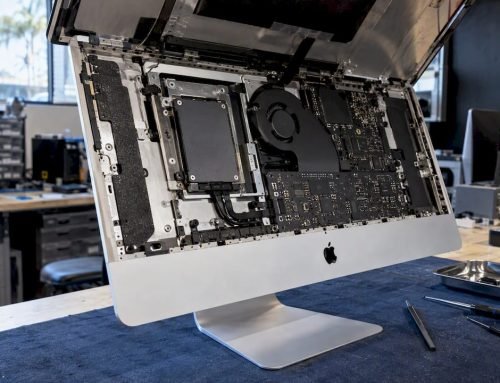
- Separate the display adhesive. Run your opening tool or wheel along the seam, cutting through the adhesive strips holding the glass and display assembly to the chassis. Go slow near the top edge where the camera and microphone cables run close to the surface.
- Prop the display safely. Lift the freed display just enough to access the internals and support it with your service wedge or a padded stand. Don’t let it hang by its cables.
- Disconnect display and speaker cables. Carefully unclip the LVDS or eDP display cable, the camera cable, and the stereo speaker connectors. These clips are small and brittle; use a spudger, not your fingernail.
- Remove the PSU retaining screws. Depending on the model, this is a mix of T8 and T10 Torx fasteners securing the power supply bracket to the rear housing.
- Disconnect the PSU connectors. Unplug the main power harness and any secondary connectors running to the logic board and fan assembly.
- Lift out the failed unit and compare part numbers. Match the label on the old power supply against your replacement before installing anything. A mismatched wattage or connector pinout will not work even if it physically fits.
- Install the replacement power supply. Reverse the removal steps: reconnect the harness, re-seat the retaining screws, and confirm every clip is fully seated.
- Reconnect display and speaker cables, then reseal. Reattach the display cable, camera, and speakers, then apply fresh adhesive strips along the same seam you opened. Reused adhesive rarely holds a proper seal.
Budget roughly an hour to two hours for a 21.5" model and up to two hours or more for a 27" unit, mostly due to the larger adhesive perimeter and more delicate display handling. If you’re doing this for the first time, allow additional time to avoid rushing. Rushing the adhesive separation step is the number one cause of cracked glass in DIY repairs, according to the same procedural cautions iFixit documents for the 27" 2017 model.
Once reassembled, don’t call it done immediately. Let the new adhesive cure per the manufacturer’s recommendation before moving the iMac, and plan on a 4 hour stress test under normal use, not just a quick power-on check, to catch a heat-related recurrence before you consider the job finished.

How Do You Test the Repair and Troubleshoot New Problems?
Power the iMac on and watch for the full sequence: LED 1 illuminating immediately when plugged in, fans spinning at startup, the chime playing, and the display lighting up within a few seconds. Run a safe boot by holding Shift during startup to confirm macOS loads without extension conflicts masking a hardware issue, then connect an external display via Thunderbolt to rule out a separate panel fault if the internal screen stays dark.
If LED 1 is still dark after installing a known-good power supply, the problem almost certainly isn’t the PSU anymore. At that point, bench technicians check the standby rail directly: if standby voltage is present but the unit won’t sequence on button press, the fault has shifted to the logic board, not the new part you just installed. That’s a different repair entirely, and one that calls for logic board diagnostics rather than another power supply swap.
Other symptoms point to specific causes:
- Intermittent power, where the machine works sometimes and not others, usually traces to a loose connector or a cold solder joint rather than the power supply itself.
- A buzzing or humming noise from the new unit suggests a coil whine issue or, less commonly, a marginal replacement part.
- Thermal shutdowns after 20 to 30 minutes of use often indicate a short elsewhere in the system rather than a power supply defect, since the new PSU should not be heat cycling under normal load.
Pro Tip: If the fans spin at full speed constantly right after reassembly, check that the temperature sensor cable near the power supply bracket reseated fully. A disconnected sensor forces the fans into a fail-safe max-speed mode that has nothing to do with the power supply’s health.
What Does an iMac Power Supply Repair Actually Cost?
Parts and labor for a power supply swap sit in a fairly predictable range, though sourcing quality changes both the price and the risk.
| Repair Path | Typical Cost Range | Key Risk Factor |
|---|---|---|
| DIY with tested refurbished PSU | $60 to $150 for parts only | Buyer must verify part number and test policy |
| DIY with new-old-stock PSU | $50 for parts only | Degraded capacitors from age, even unused |
| Professional shop repair (parts and labor) | $150 to $350 | Adhesive re-seal and display handling add cost on 27" models |
| Full logic board replacement (if PSU wasn’t the fault) | $300 or more | Requires accurate diagnosis before ordering parts |
A power supply repair makes financial sense when the rest of the machine is healthy: the internal storage still works, the installed macOS version still receives updates, and you’re not fighting a cracked display or a failing logic board on top of it. It stops making sense the moment you discover a second fault mid-repair, since display adhesive damage or an undiagnosed board issue can push total cost past what a comparable used iMac would cost outright.
Get a free diagnostic before committing to parts. A shop that offers no recovery, no charge policies on the data side and a written estimate on the repair side protects you from sinking money into a machine that has a second problem waiting underneath the first.
When Should You Call a Professional Instead?
Some situations aren’t worth the DIY route, no matter how capable you are with a screwdriver. Call a shop when data on the internal drive matters and hasn’t been backed up, since a mistake during disassembly can turn a simple power supply job into a data recovery situation. Also call a pro if you don’t own proper capacitor discharge tools, if you’ve never separated an adhesive-mounted display before, or if your diagnostic checks point to logic board damage rather than a simple power supply failure.
A quality shop should offer free diagnostics before quoting a repair, test the actual failed component rather than guessing, provide a written estimate, and back the work with a component warranty and professional repair services. Same-day turnaround matters if the iMac is a work machine you can’t be without.
Macwest Data Recovery & Mac Repair has served West LA, Santa Monica, and Beverly Hills since 2006, with the shop centrally located at 12041 Wilshire Blvd, Ste 26, between the 405 and Santa Monica Freeways, near UCLA and the Getty Center. Free diagnostics and a no recovery, no charge policy apply to the data side of any repair, and same-day appointments are available for time-sensitive cases.
When you call, ask specifically about bench time, warranty length on the replacement part, where the part is sourced from, and confirm the no recovery, no charge policy applies to your situation before you drop the machine off.
Where to Find Model-Specific Repair Guides
Before ordering a replacement power supply, match your exact model year against the correct guide. The 27" iMac 2017 PSU replacement guide and the 21.5" Retina 4K 2017 guide both include photos of screw locations, cable routing, and the exact adhesive strip layout for that chassis. Check part numbers against your machine’s serial-specific configuration, and use official photos to confirm screw sizes before you order tools.
An Editorial Take on Fixing It Yourself
The internet oversells the danger and undersells the tedium of this repair. Yes, the capacitors carry real voltage, and yes, you discharge them properly every single time. But the part that actually defeats most DIYers isn’t the electricity. It’s the adhesive.
Conventional advice treats power supply swaps as a simple parts-in, parts-out job, and mechanically that’s true. What gets glossed over is how much patience the display separation demands, especially on 27" models where a rushed pry job cracks glass that costs more than the power supply itself. If you take one thing from this guide, let it be this: budget twice the time you think you need for adhesive work, and never skip the discharge step because “it’s probably fine.”
Where I’d push back on the common wisdom is the new-old-stock trap. A “new” power supply that’s sat in a warehouse for eight years is not automatically safer than a tested refurbished unit, because capacitors degrade whether they’re running or not. Buy from someone who tests before shipping, not someone who just has stock.
If your diagnostic points anywhere near the logic board, that’s the moment to stop being a hobbyist and start being a customer. Component-level board repair is a different skill set entirely.
— Kaya
Get a Free Diagnostic Instead of Guessing
If you’ve read through the discharge warnings, the adhesive separation steps, and the part-sourcing caveats above and decided this one isn’t for you, that’s a reasonable call, not a failure. A repair service offers free diagnostics on iMac power issues, providing a confirmed cause before you spend on parts, instead of guessing between a dead power supply and a failing logic board. The service provider has handled Mac hardware repair and data recovery in the Los Angeles area since 2006, with a no recovery, no charge policy on the data side of any job that touches your drive. That matters if your iMac wouldn’t boot before the power supply failed too.
Same-day appointments are available for readers who can’t be without their machine, and the location at 12041 Wilshire Blvd, Ste 26 sits centrally for anyone in West LA, Santa Monica, Brentwood, Westwood, Venice, or Culver City. Call 310-866-0828 to schedule a diagnostic, or check the full repair service details before you decide between a DIY swap and a bench appointment.
FAQ
Is It Worth Repairing an iMac Power Supply?
Yes, in most cases, since a power supply swap typically costs $60 to $350 depending on parts and labor, far less than replacing a working iMac that still runs a supported macOS version and has a healthy drive.
Can I Fix a Faulty iMac Power Supply Myself?
Experienced hobbyists with insulated tools, a service wedge, and proper capacitor discharge knowledge can safely replace an iMac power supply at home; anyone unsure about high-voltage discharge or adhesive display separation should hire a professional instead.
How Much Does It Cost to Fix an iMac Power Supply?
DIY parts typically run $50 to $150 for a tested refurbished unit, while professional shop repairs including labor and display re-seal generally fall between $150 and $350.
What Are the Common Causes of iMac Power Supply Failure?
Aging or bulging capacitors, power surges, and general component wear after years of use are the most frequent causes, often first showing up as intermittent power or a completely dead standby LED.
How Do I Know If It’s the Power Supply and Not the Logic Board?
Check LED 1 through the back vent with the unit plugged in; if it stays dark, the power supply is the likely fault, but if it lights up and the machine still won’t turn on, the issue probably sits on the logic board.